This program allows you to register multiple images using affine transformations and requires that there be a common channel across all images. Registration is based on maximization of correlation, hence the requirement for a common channel. The use of an affine transformation assumes that the images only undergo global transformations, that is, they are rotated, translated, scaled possibly with differnt scales per axis, and sheared. Local deformations are not accounted for.
The program can be run either as an Imaris extension via the Imaris user interface or as a standalone program. It supports registration of multi-channel z-stacks (a.k.a. 3D images, volumes) and multi-channel 2D images (single slice z-stack). Sample datasets are freely availabe on zenodo.
The source code for the registration is freely available on GitHub. This registration workflow was originally developed as part of the work described in: A. Radtke et al. "IBEX - A versatile multi-plex optical imaging approach for deep phenotyping and spatial analysis of cells in complex tissues", Proc Natl Acad Sci, 2020, doi:10.1073/pnas.2018488117.
The program's input are two or more files in Imaris format that share at least one common channel. The channel to use for registration is based on the channel names in the file. A channel name consists of three parts:
- prefix
- separator character
- postfix
The user can specify a separator character, which indicates that channels with the same postfix are the same channel, otherwise the whole channel name is used. For example, two files with channels named Experiment1 : CD3_AF594 and Experiment2 : CD3_AF594. If we specify colon as the separator character these channels will be considered as the same channel, otherwise they are different.
Note: Channel names in an input file are expected to be unique, as there can only be one registration channel per file. The uniqueness is based on the separator character scheme described above. For example, a file containing two channels named step 1 : CD3 and step 2 : CD3 is considered valid if the separator character is empty, but it would be invalid if we use colon or space as the separator character, in which case both channel names become CD3.
The program will save the following outputs:
- A single Imaris file containing the resampled volumes. All channel information is copied over from the original volumes.
- A log file containing internal registration information (useful for debugging purposes understanding why a registration failed and how to configure the program to address the issue).
- A json file specifying the program settings used for registration (useful for reproducing the registration).
- Optional pdf files showing the correlation between channels before and after registration. This is useful for quantitatively evaluating the registration.
To see the current settings or modify them, press the "Advanced Registration Settings" button on the second screen. You can also load settings from previous registrations via the json configuration saved from a previous run (see above).
Options include:
- z expand factor - Useful when the number of slices in the z-stack is small (~5). Setting this value will expand the number of slices in the stack via interpolation. The expansion utilizes the SimpleITK ExpandImageFilter.
- FFT based initialization - initialize the translation using the SimpleITK MaskedFFTNormalizedCorrelationImageFilter.
- 2D affine - project the data along the z direction and perform an initial 2D affine registration which will then be used to initialize a 3D affine registration.
- 3D affine - perform 3D affine registration.
- Adjust spacing magnitude to be near 1 - resample the image so that the voxel sizes are not too small, e.g. 0.001. This improves the registration's numerical stability.
- Auto mask - limit voxels used in registration to non zero voxels.
- Samples per parameter - number of samples used during registration.
When performing registration we usually use the full resolution image, default selection for the "Start registration at resolution" dropdown. When working with large images this may require a significant amount of memory (RAM). When memory resources are constrained, one can try to start the registration at a higher level of the image pyramid, coarser data representation, which requires less memory. Note that the closer one is to the apex of the image pyramid the coarser the data representation which is potentially detrimental to registration accuracy.
Most of the time you can run the program using the default registration settings.
Note: The first registration step, FFT based initialization, requires a significant amount of RAM. On lower end machines (32GB RAM or less) it may not work. This can be ameliorated by disabling this option and enabling the 2D affine initialization step.
Failure: When the FFT based initialization step fails the whole registration may fail too. If this happens, disable the FFT option, enable the 2D affine initialization and redo the registration.
To perform 2D registration use the default settings (2D affine enabled, FFT initialization and 3D affine disabled). If registration doesn't succeed you can try modifying masking and samples per parameter or the selection of the fixed image.
Note: Imaris images, including 2D images, are positioned in 3D space. When performing 2D registration we check whether the slices are on the same z-plane (using SimpleITK epsilon). In all cases the images are registered. If they are not on the same plane, a warning about this is provided as part of the registration completion message. It is up to the user to decide whether this is an issue or if this information can be ignored. The resulting 2D image is positioned in 3D space using the z-plane of the fixed image.
In some rare cases you may want to register a z-stack using a 2.5D approach. That is, the z-stack is projected along the z-direction using a mean projection, affine registration is performed in 2D and then the z-stacks are aligned in the z-direction so that their centers are aligned.
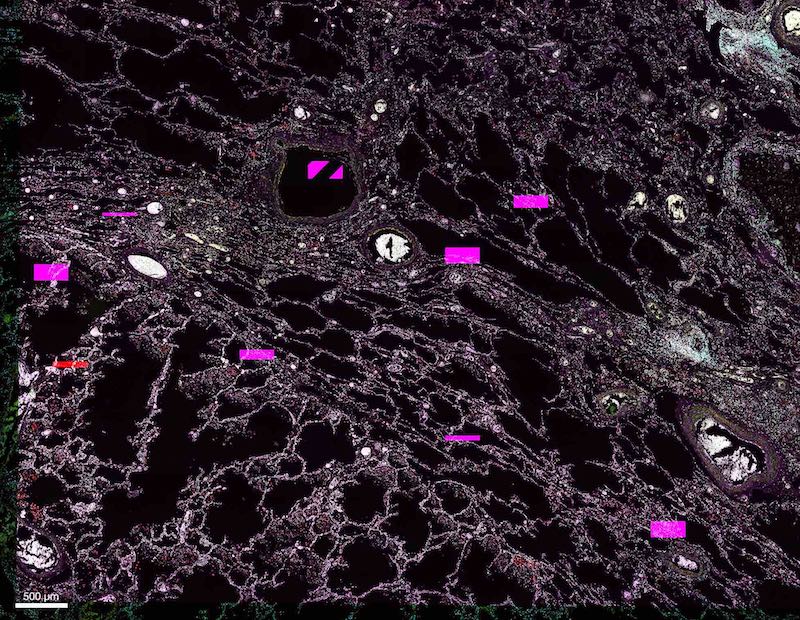
In some cases we have observed that registration appears to work, but the final result contains strange artifacts even though the input images appear to be visually valid. An example result with artifacts is shown below (image courtesy Dr. Andrea Radtke):
This is not a problem with the registration or resampling, it is a problem with the input. The original image is already corrupt. We have identified that this happens when the image is imported into imaris from its original file format and the resulting imaris file is saved to a network or external drive. Copy the original image to the local drive, import into imaris and save to local drive, problem solved.